Monday, October 21, 2013

End of the season

We are home!
The camper is parked for the season!
(better not say that to loud, anything can happen)

I have been playing catch-up with all things that were neglected the last couple of months.
That would be my main reason for being away from blog-land the last week or so.
The first  big chore was getting the house a little more organized.
(still working on that)

Then it was trying to get the garden in shape before winter.

I did a full clean out over the weekend.

I was surprised at all of the things that still needed to be picked.

Now I will have to spend the rest of this week getting them put up for winter.
The garden looks pretty bare now!

Just weeds and a row of marigolds!

I have my phone set up for weather alerts.
Today it has been buzzing wildly about the upcoming freeze expected for tonight.

Makes me kind of sad to see another growing season come to an end.
The zinnia are still happily blooming.


My rose bush is still loaded with flowers.


But I know the time has come when you look across the fields and most of the crops have been combined.

Tonight I will throw an extra blanket on the bed, and cuddle a little bit closer to the pipeliner.

And tomorrow when I start canning all of my veggies, my mind will be busy planning next years garden!

Liz

Wednesday, October 9, 2013

Jalapeno Pepper Jelly

This is our last week of camper living!
We are headed for home this coming weekend.
I am beyond ready to be home for good!

I still have plenty of things left in the garden that need to be put up. 
One thing on the top of the list was Pepper Jelly.


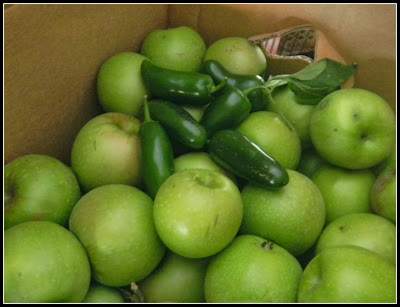
I had been trying to find a good recipe that uses Granny Smith apples.
They are very high in natural fruit pectin.
Plus my sons tree's had a bumper crop of apples this year.

I brought my supplies back to the camper.
Monday was jelly making time!


This recipe called for 4 lbs of tart apples unpeeled, chopped into big pieces, including the cores that are needed for the pectin.

6 jalapeno peppers 
I sliced them in half length wise. Three of  the peppers were seeded, and deveined. The other three I left alone.

1 green pepper seeded and cut into chunks.

1 cup cranberries

3 cups of water

3 cups white distilled vinegar

All of this went into my handy, dandy electric roaster.


I let it simmer at 300 F. for about an hour or so stirring occasionally so nothing was stuck to the bottom or sides.


The next step was to mash up the big chunks of apples to the consistency of slightly runny applesauce. If the mash is to thick add a little more water, something I had to do.

This is my jelly strainer.

Someday I am going to design a better stand then this one. 
I haven't found one I like yet!

Spoon the mash into your mesh strainer.
Then let it drain.


I let mine drip and drip for a good hour or so.

If you want to keep your jelly clear, do not force or squeeze the mash through the mesh. Just let it drip.

I ended up with a beautiful, pink colored juice!


I measured out 4 cups of juice, what the recipe called for, and put it in a heavy bottomed pan.
To this you add 3 1/2 cups of sugar.


Slowly bring to a boil, stirring constantly so the sugar dissolves.
The foam that rises to the surface needs to be spooned off.

Cook for 10 to 15 minutes.
Continue to boil until a candy thermometer has reached 220-222 F.

I didn't bring my thermometer, so there is always the push test.

Put a half teaspoon of the jelly on a chilled plate.
(Put a saucer in the freezer for 10 minute or so to chill)
Allow the jelly to cool a few seconds, then push with your finger.
If it wrinkles, its ready!


When its ready pour your jelly into hot sterilized jars, leaving 1/4 inch head space from the top.
Seal and put them in a hot water bath for 10 minutes.


This recipe makes make 4 half pint jars.

My batch came out nice and thick!

We like the jelly poured over a block of cream cheese and served with crackers.
Its is also good as a dip for jalapeno poppers.

My next batch I want a little more heat in it.
I will leave the seeds and ribs on a few more jalapenos.

As much as my family enjoys eating pepper jam, I have a feeling the next batch will be made quite soon!




Friday, October 4, 2013

Time for Tulip Planting!


The fields around the farm are turning.
The combines will soon be hard at work.

I love the smell of fall in the air!

Fall is the perfect time to plant tulips!

Last year I only got a few planted on the farm.

This year I was determined to plant more for lots of blooms this coming spring.

One place I wanted to see blooms would be around the corn crib.


I have so many ideas for this interesting structure.


But thats for another post!


Tulips bulbs come in virtually all colors anymore.  My girlfriend has an interesting garden of them in blacks and purple.

They also vary in their bloom times from early spring into early summer.

I chose an early bloomer, and a mid spring bloomer.
I like color in the yard as soon as I can have it!

The bulbs need to be planted 6 to 8 weeks before a hard frost is expected.

Tulips prefer a site with full sun or afternoon sun.

They dislike excessive moisture. Make sure they are planted in a well drained site.


I planted mine on the south west side of our crib.

They need to be planted deep. At least 8 inches.
Make sure you plant them with the pointy sides up!


When we lived in town I had a HUGE problem with squirrels! 
I would plant the bulbs, they would dig them up!
I finally found the solution with chicken wire.
I would line the bottom of the 
hole with chicken wire, put the bulb in, cover with a little dirt, then another layer of wire.
It kept those pesky animals from digging them up!


My planting buddy was on hand to watch grandma.


I told little man when these pretty flowers begin to bloom, you will be walking by then.

You and grandma can walk out together to pick a bouquet!

Time is running out, get those tulips planted today!

Have a great weekend!
Liz

Tuesday, October 1, 2013

Slow Cooker Apple Butter

Oh the apple trees are loaded again this fall!


Last year I sold quite a few bushels at the Farmers Market.
But this year we are in the camper,
no market for me.

And being in the camper makes it a little tricky to do canning.
I decided not to let that stop me.
I had my trusty electric roaster and crockpot.
Along with a new recipe for crockpot apple butter.

This could be do-able!

I brought back a bushel full of red ripe apples.


I peeled the apples, then cut them into chunks.


Into the electric roaster they went with a little water added to the bottom.

I got so involved with this step I forgot to take pics!

They cooked down for an hour or so.
Next was a trip through the food mill.

Out came a nice chunky sauce.


The sauce went into the crockpot along with 1 cup sugar, 1 cup brown sugar, 1 cup apple cider, 2 teaspoons of cinnamon, and a 1/2 teaspoon of nutmeg.


I set the temperature on low and let it cook overnight.
When the pipeliner left for work the next morning it was still a little runny.

I took the lid off and turned the temperature on high for a couple of more hours.

It looked like this a few hours later.


A nice dark brown. 

I couldn't do a hot water bath with my big canner, so I made do with what I had.


It took me a little while to do the whole batch.

But it was worth it on my cinnamon raisin bread the next morning!


Slow Cooker Apple Butter

6 pounds apples peeled, cored, and sliced
1 cup sugar
1 cup brown sugar
1 cup apple cider
2 teaspoons cinnamon
1/2 teaspoons nutmeg

I cooked my apple first in the electric roaster.
But this recipe tells you to add all of this to a slow cooker.
Cook on low for 10 hours, stirring occasionally, until the mixture is thickened and dark brown.

Use an immersion blender to puree the apple butter until smooth.

Spoon the mixture into hot, sterile jars.  
You can do a water bath for 15 minutes or cover and refrigerate for up to 2 weeks.

What a great fall treat!

Liz