Monday, September 24, 2012

Crockpot Pork Chop Dinner

I knew when I received this recipe from Betty Crocker via email, it would be filed away for a cool, fall night.  The other day looked like a hectic one. I remembered I had this recipe, plus all of the ingredients on hand.  It is so simple to throw together, and so tasty at supper time.

Get your crockpot out!  This is an easy one!


                                       Pork Chop Dinner with Apples, Squash & Sweet Potatoes


1 small butternut squash
3 large unpeeled cooking apples
2 medium sweet potatoes
4 pork loin chops, 3/4 inch thick
3/4 cup brown sugar
2 tbsp. all-purpose flour
1 tsp. ground cinnamon
1/2 tsp. salt


Peel your squash. Then cut it in half; remove the seeds. Cut squash into 1/2 inch chunks.  Peel your sweet potatoes. Cut them into 1/2 inch rounds. Cut apples into quarters, remove the core and seeds. Cut apple pieces in half crosswise. Throw all of this in the bottom of your crockpot.


In a small bowl mix brown sugar, flour, cinnamon, and salt. Coat pork chops with sugar mixture.


Sprinkle any remaining sugar mixture over the squash, apples, and sweet potatoes.
 
 
Place the pork chops on the top of everything.


Put the cover on. Set your heat to low. Cook for 7- 8 hours.
 
When I arrived home that night, the house smelled wonderful. The aroma of cinnamon and apples greeted me as soon as I opened the door.
 
Here is everything all cooked. Ready for the dinner table.


I used a thinner pork chop then the recipe called for. Next time I will make it with the thicker ones, but that is what I had on hand.
 

Friday, September 21, 2012

Lizzys Baked Caramel Corn

The "pipeliners" favorite fall treat just happens to be my baked caramel corn. Today definitely had a taste of fall in the air. I thought it would be the perfect day to surprise him with a batch.

Most caramel corn recipes I come across anymore use microwave popcorn. I think you need to pop your corn the old fashioned way. In a frying pan with hot oil and yellow corn kernels.

Drizzle enough vegetable oil to lightly cover the bottom of the pan.  Turn your heat to Med/High heat. Then cover the bottom of the pan with a layer of corn kernels.

 
Put a lid on your pan. Shake the kernels around so they are all covered with the oil.  Let the popcorn pop until the pan is full. Give your pan a couple of shakes during the popping. This settles the kernels to the bottom of the pan ensuring that all of the kernels pop. Keep a close eye on the popping corn. It doesn't take long for the corn to burn. And that makes for one smelly kitchen!


My little dog does her popcorn dance while the corn pops! She loves, loves popcorn!

It usually takes a couple of batches of popping corn to get 6 quarts of popped corn. I divide them between to foil pans. I have saved these pans just for making my caramel corn.
 
Next I make the caramel.
Melt 2 sticks of margarine in a pan.
To the melted margarine I add 2 cups of brown sugar and 1/2 cup of light corn syrup.
Stir continuously until everything is mixed.
Keep stirring on high heat until the mixture come to a full rolling boil.
Set your kitchen timer for 5 minutes. Let the mixture boil without stirring.
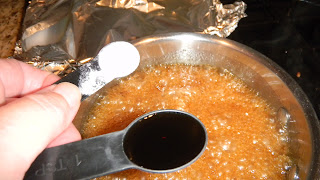
After the 5 minutes are up, remove the mixture from the heat. Quickly stir in 1/2 tsp of baking soda and 1 tsp. of vanilla extract.
Stir until the baking soda and vanilla are combined. The mixture will bubble up and become frothy.
 
Pour this mixture over the popped corn. I divide mine equally between my 2 pans of popped corn.
With a wooden spoon stir the caramel mixture until all of the popcorn is coated.
 
The pans of corn go into a preheated 250.F oven. The caramel corn bakes for 1 hour, stirring the mixture every 15 minutes.
 
After it has baked for an hour, pour the mixture on wax paper to cool.
 
 
I like to divide mine up between plastic bags to send with the "pipeliner" at work. But it stays fresh in a covered container for 3-5 days.
 
I know when the "pipeliner" opens his lunch pail tomorrow he will be thrilled with his treat. And I am sure his co-workers will be happy as well. He does like to share!
Happy Fall!
 
 
Lizzy's Baked Caramel Corn
 
6 quarts of popped popcorn
 
2 sticks of margarine
2 cups brown sugar
1/2 cup light corn syrup
1 teaspoon vanilla extract
1/2 teaspoon baking soda


Bake in a 250F. oven for 1 hour


Wednesday, September 19, 2012

Recipe "scraps"

One of my girlfriends on Face book had an interesting post the other day. She asked how many people had their favorite recipes written on scraps of paper. Do you ever intend to write them all down in a recipe book.  She had many great responses.  One was about finding the best tasting chicken & noodles dish at a church potluck. The only thing handy to write the ingredients on was a used napkin.   Or finding the most scrumptious dessert at a co-workers baby shower. That recipe was wrote on the back of  a shower game that she had been playing.

The thing that really struck a cord with me about her entry was I had just received a plastic bag full of recipe "scraps" that had belonged to my grandmother.


My grandmother passed over 20 years ago. It was wonderful to receive all of these recipes, but one of the most special things was seeing her handwriting again. She always had such great penmanship.

Then I began sifting thru them all. Many of the recipes were written on different scraps of paper.


 The recipe written on the paper with the tractors on it, that was a letter head from my grandparents implement dealership.  I can picture my grandma sitting behind her desk, maybe thumbing thru a woman's magazine. Finding a recipe that caught her eye. Then jotting it down on the nearest paper handy.

This recipe was written on the back of a desk calender page. Notice the date.


There was also a collection of recipes that had been on bags of marshmallows, popcorn, and cereal boxes.

Grandma kept her all her recipes in a drawer located in her kitchen. I remember before every holiday she would have that drawer pulled open, chair pulled up next to it. She would look thru all of her envelopes marked for that certain dish that was being prepared. Oh she would have piles of those recipe scraps scattered across the counter tops. I always knew she was cooking up something good.

I decided to go thru my recipe scraps.  I smiled to myself when I realized just how many I had in my collection. Most of the tried and true ones are held in this little basket.

This basket held a plant that I had received when my daughter was born. Over 21 years ago!  Most recipes in here are also my kids favorites!

I had started writing recipes down in a notebook. Even taping or pasting recipes that I had cut out of magazines in there as well.
There are still plenty of recipe cards received from friends and co-workers  that need to be glued in.


I am so glad I read that friends post. She really got me to thinking about how many generations of women have these recipe scraps stuck somewhere in their kitchen. Hopefully someday my future granddaughter will come across my recipe scraps. May they bring her as much happiness as my grandmothers did for me!

Sunday, September 16, 2012

Making tomato juice

The tomatoes in the garden are still producing fast and furious. I have been canning tomato juice, spaghetti sauce or bbq sauce at least twice a week. I will admit it can be a time consuming process, but in the end it is so worth it. Especially when the pipeliner is stirring up a batch of his spicy chili in the middle of winter. All he has to do is open up the pantry door, reach up and grab for a jar of homemade juice. One that has been specially seasoned just for his chili!

While the pipeliner was out pipelining this past Sunday, I worked on a batch of tomato juice with his chili in mind.


I washed off the all the tomatoes I had just gathered from the garden.
This variety of tomatoes are called Celebrity.
 
Most basic juice recipes call for peeled and cored tomatoes. The easiest way to do this is by putting your tomatoes into a pot of boiling water for 60 seconds.
Then immediately plunging them into a bowl filled with ice water.
                                             They peel right off! Just take your knife and cut out the core.
I also added 3 stalks of celery, 3 small onions, 4 purple peppers, 2 cayenne peppers and a couple of garlic cloves.I sprinkled a teaspoon of canning salt over the top. Then I poured a 1/2 cup of vinegar in as well. Those are yellow tomatoes in there. They were ones that didn't sell at Saturdays farmers market. Can't let any of those tomatoes go to waste!
                                         I have found my roaster is the best thing to mix and cook all of these veggies in.
I set the temperature at 300 F. -350 F. Cover and let the cooking begin!   Remember to stir things up every 15 minutes or so.   Depending how many tomatoes you have simmering away, it usually takes a good hour or so for all of the veggies to become tender. The smells inside of your kitchen will be heavenly!

When it is all simmered to a softened mixture it should look something like this: Lots of flavor filled juices filling the pan.

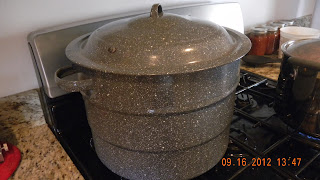
 Now is a good time to fill your water-bath pot full of water, then get it on your stove.  You want it to be at a full rolling boil by the time you get done pressing your mixture.


I use an old fashioned food press.  This also a great tool for making applesauce! Put the press over a pot big enough to hold all of the extracted juices.  With a large measuring cup just dump some of your veggie mix into the press and turn the crank.
When you have squeezed every last bit of juice out, return the pot of hot juice back on the stove. Bring it back to a simmer, then cover.
While that is simmering away, you want to get your jars ready.
Make sure you wash them along with the lids and bands in a very hot soapy bath.
My mother in law taught me a little trick to keep the jars hot before filling them. Heat your oven to 350F.  Line up your jars on a cookie sheet, then turn off the oven and pop the jars in to the preheated oven.
Your lids and bands should be in a separate pan of boiling water, waiting to be screwed on the jars.
Now comes the time to fill your jars.
Take the jars out of the oven a carefully ladle the hot juice into them. Make sure there  is no foam around the edges of the filled jars. If there is use a spoon to remove it.
Wipe the rims of the jars with a hot,wet, clean cloth. Carefully put on a hot lid, then screw on the bands. You may have to go back and re tighten each band.
Now you are ready to add the jars to your boiling pot of water.
Most canners have a metal jar holder. This makes it easier to lower your jars into the boiling water and then remove them later.
The water should cover each jar by an inch or so. Put the lid back on the pot. Bring your water back to a full rolling boil.
Quart jars should process for 30 - 40 minutes. Pint jars 25-30 minutes.
Carefully remove the cooked juice from your pot.
(Hey, they look the same as they did before I put them in the water!)
In the next hour or so you should hear a popping noise from each lid. That means they have sealed. If the lid hasn't sealed within the next 6 hours that jar of juice needs to be refrigerated and used within the next week.
A properly sealed lid doesn't pop back up after you poke the middle of it with your finger.
Make sure you label your jars with its contents and date as soon as it cools
Most canned tomato juice is usually good for 9 -12 months
 
I am sure there will be more jars of tomato mixtures added to the pantry closet in the weeks to come. Fingers crossed I can get the most out of my tomatoes before the first big frost hits!